Стаття для тих, хто вже працював із терміналом
Цей мануал передбачає базові навички роботи з Ubuntu/Linux, Git і Telegram-ботами. Якщо щось із цього звучить незнайомо — не проблема: будь-який AI-чат пояснить крок за кроком. Просто опишіть, що саме ви робите, і запитайте ChatGPT, Gemini, Claude чи інший інструмент на ваш вибір. Вони впораються зі вступними краще, ніж будь-який статичний мануал.
TL;DR
- Мануал починається з уже встановленої Ubuntu: закладайте кілька годин на базову систему й окремий час на vault, skills та наскрізний тест.
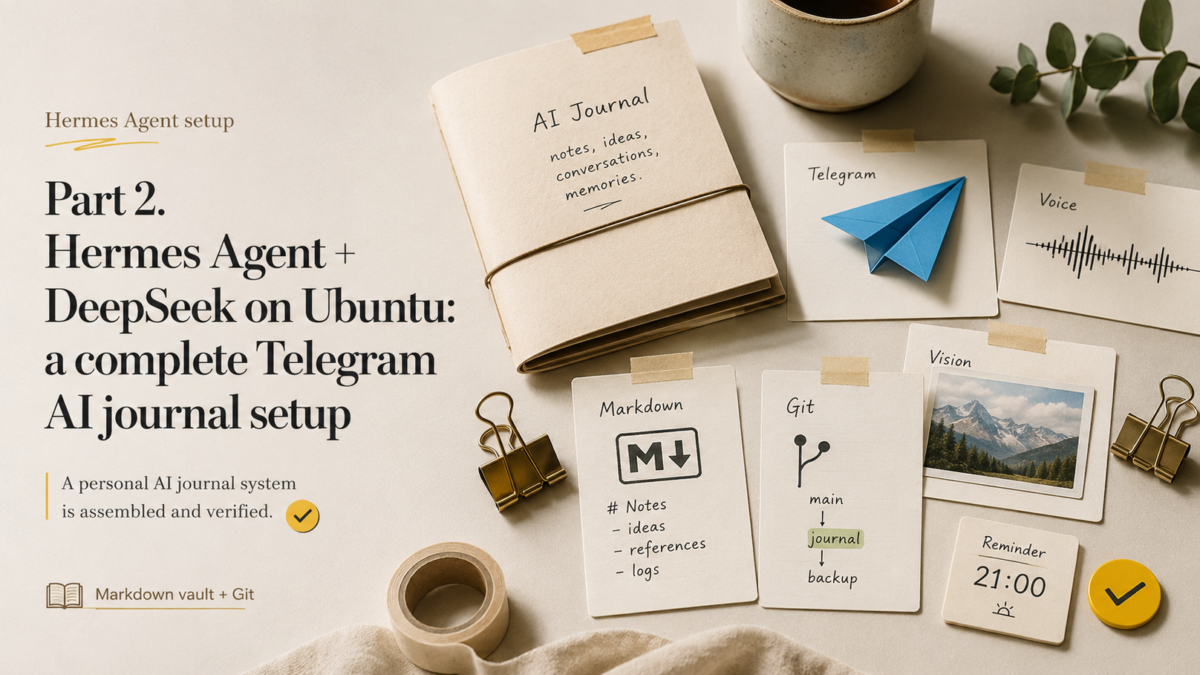
- Зберемо Telegram-щоденник на Hermes Agent із DeepSeek, локальним розпізнаванням мовлення та приватним Git-репозиторієм.
- Текст, голос і зображення йдуть різними перевірюваними шляхами, а сирі вихідні дані завжди зберігаються поруч із підсумковим записом.
- Після кожного кроку є перевірка, тому помилка локалізується одразу, а не під час запуску всієї системи.
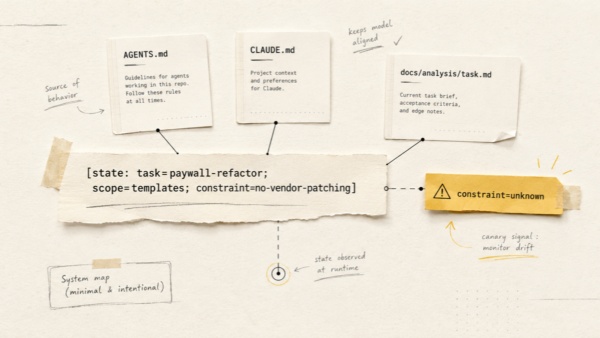
У першій статті я розповів, як старий Xiaomi Mi Gaming Laptop став домашнім AI-сервером для щоденника самопочуття, і чому після місяця з OpenClaw я зібрав систему заново на Hermes Agent і DeepSeek. Тепер найцікавіше: повторити мою конфігурацію з нуля. Це мануал, який я хотів би прочитати сам на початку 2026 року, замість того щоб збирати його по крихтах.
Я свідомо побудував його за принципом «крок, перевірка, наступний крок». Коли я збирав першу версію системи, моєю головною помилкою було налаштувати все одразу й потім два вечори з’ясовувати, який із шести компонентів мовчить. Не повторюйте: перевіряйте кожен шар окремо.
Мануал довгий, але маршрут простий. Спочатку ми дамо агенту голос і канал зв’язку, потім навчимо перетворювати повідомлення на ваші файли, а наприкінці додамо пам’ять, backup і звичку. Після кожного етапу система вже вміє щось завершене:
- Кроки 1–6: бот відповідає на текст, голос і зображення.
- Кроки 7–9: повідомлення перетворюються на перевірюваний Markdown-архів з історією змін.
- Кроки 10–12: щоденник стає щоденною системою, переживає перезавантаження й нагадує про себе сам.
Не обов’язково проходити все за один вечір. Найкраще місце для першої зупинки — після голосового тесту на кроці 5; друге — після першого успішного commit на кроці 9. Робоча проміжна система корисніша за втомлену людину, яка о другій ночі намагається відлагодити vision, Git і cron одночасно.
Не копіюйте команди до перевірки версій
Hermes Agent розвивається швидко. Поточний аудит виконано на Hermes v0.12.0 (2026.4.30), commit 4f3766917 та Ubuntu 24.04.4 LTS; дата перевірки: 2026-06-07. Для новішої версії звіряйтеся з офіційним репозиторієм.
Перевірена voice-конфігурація
NVIDIA driver 535.309.01, GTX 1060 6 GB, CUDA 12.2, ffmpeg 6.1.1 і faster-whisper 1.2.1. Модель medium працює на CUDA з int8_float32; 22 секунди тестового аудіо транскрибовано за 2.17 секунди.
Частина 2 з 3: встановлення з нуля
Що ми збираємо

Та сама система в текстовому вигляді:
Telegram (тільки ви, за allowlist)
        │
        ▼
Hermes Gateway на Ubuntu-машині (systemd, має працювати постійно)
  ├─ DeepSeek: текстова нормалізація записів
  ├─ faster-whisper: локальне розпізнавання голосових
  ├─ auxiliary vision: окремий провайдер для зображень
  ├─ skills: wellbeing-journal + wellbeing-reflection
  └─ cron: нагадування щовечора о 21:00
        │
        ▼
Markdown vault (Obsidian-сумісний)
        │
        └─ git commit → приватний GitHub-репозиторій
З заліза підійде машина, яка може стабільно працювати цілодобово й відповідає вимогам обраних компонентів. У мене це ігровий ноутбук 2019 року на полиці домашнього офісу: його GPU прискорює розпізнавання мовлення, але faster-whisper працює і на CPU, просто повільніше. Конфігурація, яку треба зафіксувати перед публікацією:
| Компонент | У мене | Мінімум |
|---|---|---|
| ОС | Ubuntu 24.04.4 LTS, kernel 6.17.0-22-generic, x86_64 | Актуальна стабільна Ubuntu |
| CPU/RAM | Intel i7-8750H (6C/12T), 15 GiB RAM / 10 GiB available | Будь-який x86-64, 8 GB RAM |
| GPU | GTX 1060 Mobile (6 GB) + Intel UHD 630; NVIDIA 535.309.01, CUDA 12.2 | Не обов’язковий (CPU-режим STT) |
| Диск | NVMe 154 GB, 84 GB free (43%) | 20 GB вільно |
| Hermes Agent | v0.12.0 (2026.4.30), commit 4f3766917 | Та сама версія, що в статті |
Перед початком: Ubuntu, акаунти та секрети
Встановлення Ubuntu я свідомо виношу за межі: якісних інструкцій достатньо, почніть з офіційної документації Ubuntu Server. Вихідна точка мануалу: чиста оновлена система, доступ до інтернету й користувач із sudo.
Підготуйте заздалегідь, щоб потім не стрибати між вкладками:
- акаунт Telegram (бот створюється безкоштовно через BotFather);
- акаунт на платформі DeepSeek і платіжний метод для API key;
- акаунт OpenAI з невеликим бюджетом для vision-шару (опційно, без нього працюють текст і голос);
- акаунт GitHub з увімкненою двофакторною автентифікацією;
- Obsidian на десктопі для перегляду записів (опційно, vault лишається звичайним Markdown).
Правило для секретів на весь мануал
API-ключі й токени живуть тільки в ~/.hermes/.env і менеджері паролів. Ніколи: у vault, у Git-репозиторії, у скриншотах. Усі ключі в цій статті: placeholder’и, не намагайтеся їх використати.
І останнє: вирішіть, де стоятиме машина. Мій ноутбук живе на настінній полиці вище рівня голови. Причина прозаїчна: кіт. Якщо у вас є тварини, діти чотирьох років чи інші джерела хаосу, продумайте це до того, як система стане частиною щоденної рутини.
Крок 1. Підготувати Ubuntu
Оновлюємо систему й ставимо базові залежності:
sudo apt update && sudo apt upgrade -y
sudo apt install -y git curl ffmpeg python3
ffmpeg знадобиться для конвертації голосових повідомлень Telegram перед розпізнаванням, Python — для Hermes і helper-скриптів. В аудиті 2026-06-07 python3, git, node і rg були доступні, але ffmpeg і standalone uv не були знайдені в PATH. Якщо uv --version не відповідає, поставте його за офіційною інструкцією astral.sh/uv або використайте оточення Hermes із ~/.hermes/hermes-agent/venv/.
Одразу перевірте часовий пояс: від нього залежить, чи прийде вечірнє нагадування справді ввечері.
timedatectl
# за потреби:
sudo timedatectl set-timezone Europe/Madrid
Якщо плануєте GPU для розпізнавання мовлення, перевірте, що система бачить карту:
nvidia-smi # перевірено: GTX 1060 6 GB, driver 535.309.01, CUDA 12.2
Перевірка: timedatectl показує ваш часовий пояс, ffmpeg -version відповідає без помилок.
Якщо не спрацювало: не йдіть далі. Кожен наступний крок спирається на цей.
Крок 2. Встановлення Hermes Agent
Офіційне встановлення виконується однією командою. Але перш ніж виконувати будь-який curl | bash з інтернету, зокрема цей, відкрийте URL у браузері й перегляньте скрипт: ви маєте розуміти, що збираєтеся запустити на машині, яка зберігатиме ваш особистий щоденник.
curl -fsSL https://raw.githubusercontent.com/NousResearch/hermes-agent/main/scripts/install.sh | bash
echo $SHELL            # з'ясовуємо активний shell
source ~/.bashrc       # bash — default на Ubuntu
# source ~/.zshrc      # якщо ви перейшли на zsh
Потім діагностика:
hermes doctor
hermes --version
У мене на цьому етапі все пройшло не з першого разу. Після встановлення команда hermes взагалі не знаходилася в PATH, хоча інсталятор відпрацював без помилок. Проблема виявилася банальною: новий shell не перечитав конфіг. source ~/.bashrc — і все запрацювало. Але ці кілька хвилин я пригадую щоразу, коли бачу в мануалах рядок source ~/.bashrc і думаю «і так зрозуміло, пропустити».
Перевірка: hermes doctor не показує критичних проблем, hermes --version виводить версію. Запишіть її: це ваша точка відліку при будь-якому troubleshooting.
Очікуваний результат: critical checks проходять; в аудиті 2026-06-07 hermes doctor показав PASS за критичними перевірками й minor OAuth warnings.
Якщо не спрацювало: найчастіше річ у PATH: перезапустіть термінал або виконайте source для вашого конфіга shell ще раз.
Крок 3. Підключити DeepSeek для тексту
DeepSeek у цій архітектурі — робоча конячка. Спочатку хотілося підключити сильнішу модель — у мене вже були оплачені підписки. Але коли я порахував, скільки токенів з’їдає щоденна рутина з heartbeat, check-in і cron-задачами, стало зрозуміло, що флагманські моделі для вечірнього щоденника — це рішення не тієї проблеми. DeepSeek нормалізує записи швидко й дешево, а сильну модель можна підключати точково для місячної рефлексії.
Створіть API key в особистому кабінеті офіційної платформи DeepSeek і запустіть інтерактивний вибір моделі:
hermes model
Виберіть DeepSeek у списку провайдерів і введіть ключ, коли Hermes його запросить: він збереже секрет у ~/.hermes/.env як DEEPSEEK_API_KEY. Не редагуйте файли руками, поки CLI вміє робити це сам. Якщо інтерактивний вибір не з’явився (наприклад, headless-сесія без TTY), у перевіреній версії використовуються ключі model.default, model.provider і model.base_url у ~/.hermes/config.yaml.
Актуальний model ID на дату перевірки: deepseek-v4-flash. Поточні ціни для цієї перевірки: cache hit $0.0028, cache miss $0.14, output $0.28 за 1M tokens (перевірено: 2026-06-07, перед налаштуванням відкрийте офіційну сторінку цін).
Smoke test, не виходячи з термінала:
hermes -z "Відповідай одним словом: працює?"
Перевірка: агент відповідає, у відповіді видно, що використано модель DeepSeek.
Якщо не спрацювало: перевірте, що ключ записано в ~/.hermes/.env, що в акаунта DeepSeek є додатний баланс, і що model ID не застарів (це трапляється).
Крок 4. Створити Telegram-бота й закрити його на замок
Спочатку створюємо бота через офіційний інструмент Telegram:
- Відкрийте Telegram і знайдіть @BotFather (синя галочка, офіційний).
- Надішліть команду
/newbot. - BotFather запитає ім’я бота (відображуване, наприклад «My Wellbeing Journal») і username (має закінчуватися на
_bot, наприкладmy_wellbeing_bot). - У відповідь отримаєте HTTP API token на кшталт
7123456789:AAF.... Одразу збережіть його в менеджер паролів — показується один раз, потім лише скидання через/revoke.
Далі знадобиться ваш numeric user ID. Найпростіший спосіб дізнатися його: напишіть боту @userinfobot у Telegram — він відповість вашим ID одним рядком. Запишіть його поруч із токеном. Поточний Hermes path: пройти hermes gateway setup або надіслати /whoami в Telegram DM своєму боту після підключення.
Підключаємо gateway:
hermes gateway setup
Майстер налаштування запитає токен бота. Найважливіше в цьому кроці: allowlist. У підсумковій конфігурації має з’явитися:
# ~/.hermes/.env
TELEGRAM_ALLOWED_USERS=123456789   # ваш numeric ID, placeholder
Найбільше часу я витратив не на моделі й не на Ubuntu, а на те, щоб розібратися з різницею між chat ID, user ID та allowlist. Це три різні налаштування, які легко переплутати, і я їх переплутав:
| Налаштування | За що відповідає |
|---|---|
TELEGRAM_ALLOWED_USERS | Хто взагалі має право розмовляти з ботом. Авторизація. |
TELEGRAM_HOME_CHANNEL | Куди бот доставляє повідомлення за замовчуванням (наприклад, cron-нагадування). Адреса доставки. |
--deliver telegram:<chat id> | Явна адреса доставки конкретної cron-задачі. |
Указати chat ID для доставки недостатньо, щоб закрити бота: без allowlist він лишається відкритим для всіх, хто знайде його за іменем. Особистий щоденник із відчиненими дверима: найгірша комбінація з можливих.
Запускаємо й перевіряємо:
hermes gateway            # foreground, для першої перевірки
# потім, для постійної роботи:
hermes gateway install    # встановлює systemd-сервіс
hermes gateway status
Перевірка: напишіть боту «привіт» зі свого акаунта: він має відповісти. Попросіть когось з іншого акаунта написати йому: бот має мовчати.
Якщо не спрацювало: дивіться логи (~/.hermes/logs/gateway.log), найчастіше проблема в токені або в тому, що в allowlist записано не numeric ID, а username.
Крок 5. Локальний faster-whisper для голосових
Голосові повідомлення: головний інтерфейс системи. Саме повідомлення проходить через Telegram, але після доставки Hermes розпізнає його локальним faster-whisper, не надсилаючи аудіо ще одному хмарному STT-провайдеру. Voice-залежність встановлюється так:
cd ~/.hermes/hermes-agent
uv pip install -e ".[voice]"
Команда виконується в оточенні, яким керує встановлення Hermes. У перевіреній системі virtualenv розташований у ~/.hermes/hermes-agent/venv/. Якщо standalone uv не знайдено в PATH, спочатку відновіть/встановіть uv або використайте documented update/install path Hermes для цієї версії.
Фактичний STT-конфіг на 2026-06-07:
stt:
  enabled: true
  provider: local
  local:
    model: medium
    language: ''
Цей конфіг обирає мультимовну модель faster-whisper medium. У перевіреному runtime використовується faster-whisper 1.2.1, device cuda і compute type int8_float32.
Далі вибір розміру моделі, і тут чесна розвилка:
- base: швидко навіть на CPU, для коротких побутових нотаток однією мовою зазвичай достатньо;
- medium: помітно точніше на змішаному мовленні й термінах, але потребує GPU або терпіння;
- перевірена конфігурація:
medium, CUDA на GTX 1060 6 GB,int8_float32; 22 секунди аудіо обробляються за 2.17 секунди.
Порада з експлуатації: не женіться одразу за великою моделлю. Через пару тижнів стане видно, які слова розпізнаються стабільно погано, і контекстний словник виправлень (він з’явиться в третій статті) лікує це дешевше, ніж перехід на важку модель.
Перевірка: надішліть боту голосове повідомлення на 20–30 секунд вашою мовою. У контрольному тесті 22 секунди аудіо було транскрибовано за 2.17 секунди на GPU.
Якщо не спрацювало: перевірте ffmpeg, імпорт faster_whisper в Hermes venv, nvidia-smi, вільну RAM/VRAM і логи gateway.
Хмарний STT як fallback
У Hermes є хмарні STT-альтернативи (Groq, OpenAI, Mistral). Вони швидші на слабкому залізі, але кожне голосове повідомлення при цьому йде третій стороні. Для щоденника самопочуття я вважаю це неприйнятним за замовчуванням: обирайте хмару свідомо, а не тому, що так простіше.
Крок 6. Окремий vision-шар для зображень
Нагадаю, як влаштований шлях картинок: у цій конфігурації DeepSeek відповідає за текст, а скриншоти тренувань із Hevy й фото документів ідуть через окремий допоміжний vision-шар. Це окремий провайдер з окремим бюджетом, у мене це OpenAI API з невеликим лімітом витрат. Крок опційний: я підключаю vision за бажанням і користуюся ним досить рідко, тож якщо вам не потрібні картинки, його можна пропустити й спокійно жити на тексті з голосом.
# ~/.hermes/config.yaml
auxiliary:
  vision:
    provider: openai
    model: auto  # resolved model потрібно підтвердити в логах перед публікацією
# ~/.hermes/.env
OPENAI_API_KEY=sk-placeholder
Якщо ви ніколи не працювали з OpenAI API: ключ створюється в розділі API keys, а ліміт витрат налаштовується в billing/usage-розділах особистого кабінету. Поставте жорстку місячну стелю одразу: vision-запити дорожчі за текстові, скриншоти ви надсилатимете щодня, і стеля перетворює можливий сюрприз у найгіршому випадку на «бот перестав бачити картинки до кінця місяця».
Перевірка: надішліть боту будь-який скриншот без особистих даних, наприклад вікно термінала. Бот має описати, що на зображенні.
Якщо не спрацювало: звірте ім’я моделі з актуальною документацією OpenAI, перевірте ключ і логи. Типовий симптом непідключеного vision-шару: бот нормально відповідає на текст, але на картинку відповідає «не бачу зображення» або помилкою провайдера. Симптом застарілого model ID: помилка на кшталт model not found у логах gateway.
Тут можна зупинитися на ніч
Якщо текст, голос і тестове зображення проходять, у вас уже є робочий Telegram-агент. Наступні кроки не роблять його розумнішим — вони дають йому пам’ять. Vault, Git і cron можна відкласти на наступний вечір.
Крок 7. Створити Markdown vault
Перша версія архіву виглядала значно правильнішою. Там були inbox, вкладені категорії, пронумеровані рівні і навіть папка для «неотсортованого». Через місяць я зрозумів, що витрачаю більше часу на підтримку структури, ніж на самі записи. Тому поточний vault виглядає майже нудно — і саме в цьому його сенс:
wellbeing-journal/
├── daily/YYYY/MM/YYYY-MM-DD.md        # один запис на день, canonical імʼя
├── weekly/YYYY/YYYY-Www.md            # тижневі зведення
├── monthly/YYYY/YYYY-MM.md            # місячні рефлексії
├── notes/
│   ├── terminology.md                 # ваші терміни: вправи, добавки
│   ├── measurements-history.md        # історія вимірювань
│   └── known-asr-errors.md            # словник виправлень розпізнавання
├── documents/
│   ├── lab-results/YYYY/MM/
│   └── reports/YYYY/MM/
├── attachments/YYYY/MM/YYYY-MM-DD/    # оригінали скриншотів і фото
├── audio/                             # голосові, згідно з retention policy
├── templates/
│   ├── daily.md
│   ├── weekly.md
│   ├── monthly.md
│   └── lab-result.md
├── scripts/
│   ├── validate-entry.sh
│   ├── build-reflection-context.sh
│   ├── sync-to-mobile.sh
│   └── commit-entry.sh
├── _system/
│   ├── schema.md                      # контракт frontmatter
│   ├── scales.md                      # визначення шкал 1–10
│   ├── safety.md                      # медичні межі skill
│   └── retention-policy.md
├── dashboards/
├── JOURNAL_GUIDE.md
├── .gitignore
└── .obsidian/
Ключовий контракт системи: Markdown для людини, YAML для автоматики. Тіло запису лишається вільним текстом, а все, що потім рахуватимуть дашборди й рефлексії, живе строго у frontmatter:
---
date: 2026-06-06
schema_version: 1
sleep_hours: 7.5
sleep_quality: 4
energy: 3
mood: 4
stress: 2
pain: 0
training: strength
symptoms: []
medications_changed: false
source: telegram
needs_review: false
---
Три правила, порушення яких я потім дорого виправляв у власному архіві:
- невідоме значення лишається
nullабо порожнім, модель ніколи не підставляє 0 замість «не сказав»; - дата у frontmatter зобов’язана збігатися з іменем файлу;
- шкали (настрій, енергія, стрес) визначені в
_system/scales.mdз якорями, і самооцінка користувача завжди важливіша за «оцінку за тоном повідомлення».
Якорі шкал захищають від semantic drift. Без них модель колись вирішить, що «все бісить» — це високий стрес, хоча для вас це низька енергія. Мої робочі якорі з _system/scales.md:
## Настрій (mood)
- 1–2 — пригнічений, туга | 3–4 — роздратований, все бісить
- 5–6 — рівно, нейтрально (норма!) | 7–8 — піднесено | 9–10 — ейфорія

## Енергія (energy)
- 1–2 — вимкнений | 3–4 — млявість, провал після обіду
- 5–6 — робочий режим | 7–8 — бадьорість | 9–10 — гіперактивність

## Стрес (stress)
- 1–2 — штиль | 3–4 — легкий фон
- 5–6 — помітний тиск | 7–8 — тривога, поганий сон | 9–10 — криза
Важлива деталь щодо настрою: 5–6 — це норма, а не «погано». І головна порада щодо оцінок: не думайте. Перша цифра, яка прийшла в голову — і є правильною. Чим довше вибираєш між четвіркою й п’ятіркою, тим менше ця цифра значить.
Перевірка: створіть структуру, покладіть один тестовий daily-файл за шаблоном і відкрийте папку в Obsidian: vault має відкриватися без помилок і без обов’язкових community-плагінів.
Крок 8. Skills: ядро без моноліту
Skills у Hermes живуть у ~/.hermes/skills/, кожен у своїй папці з обов’язковим SKILL.md. Моя перша версія журнального skill була одним файлом на сотні рядків, і перевіряти його поведінку було неможливо. Робоче компонування: два skill, у кожного коротке ядро й винесені references.
~/.hermes/skills/personal/wellbeing-journal/
├── SKILL.md                  # коротке ядро: flow і правила маршрутизації
├── references/
│   ├── schema.md             # копія контракту frontmatter
│   ├── input-text-voice.md   # обробка тексту й голосових
│   ├── input-images.md       # обробка зображень і OCR
│   ├── safety.md             # медичні межі
│   ├── provenance.md         # правила джерел
│   └── git-workflow.md       # правила комітів
├── templates/
│   └── confirmation.md       # шаблон підтвердження в Telegram
└── scripts/
    ├── validate_entry.py
    ├── upsert_daily.py
    └── safe_commit.sh

~/.hermes/skills/personal/wellbeing-reflection/
├── SKILL.md                  # тільки тижневий/місячний аналіз
├── references/
│   ├── reflection-rubric.md
│   └── medical-boundaries.md
└── scripts/
    └── build-reflection-context.sh
Ядро журнального skill цілком. Для Hermes v0.12.0 потрібен YAML frontmatter з обов’язковими полями name і description:
# wellbeing-journal

Ти ведеш особистий щоденник самопочуття користувача. Ти асистент
журналювання, не лікар: не ставиш діагнози, не призначаєш і не скасовуєш
лікування, не інтерпретуєш термінові симптоми. Повні правила: references/safety.md.

## Вхідні формати

- Текст: денна нотатка або відповідь на вечірній check-in.
- Голос: transcript уже підготовлений системою. Правила: references/input-text-voice.md.
- Зображення: скриншоти тренувань і фото документів. Правила: references/input-images.md.

## Основний flow

1. Визнач дату запису. Якщо дата неоднозначна, постав ОДНЕ уточнювальне питання.
2. Витягни тільки явно повідомлені факти. Не додумуй значення.
   Відсутня метрика лишається null, ніколи не 0.
3. Нормалізуй шкали за _system/scales.md. Самооцінка користувача важливіша за
   твою оцінку тону.
4. Збери відсутні ОБОВʼЯЗКОВІ поля в одне компактне питання
   («Сон / енергія / настрій / стрес цифрами одним рядком?»).
   Не питай опційні поля.
5. Запиши в canonical шлях daily/YYYY/MM/YYYY-MM-DD.md через scripts/upsert_daily.py:
   повторна обробка тієї самої дати оновлює файл, не створює новий.
6. Сирий ввід (transcript, текст) збережи в розділі Raw окремо від Summary.
   Ніколи не перезаписуй Raw своєю інтерпретацією.
7. Дані із зображень познач needs_review: true і source: ocr.
8. Прожени scripts/validate_entry.py. Якщо перевірка падає, повідом про помилку,
   не коміть.
9. Коміт тільки через scripts/safe_commit.sh (він же secret scan).
10. Надішли коротке підтвердження за templates/confirmation.md: що збережено,
    які поля заповнені, що лишилося needs_review.

## Заборонено

- Медичні висновки, діагнози, поради щодо ліків і дозувань.
- Інтерпретація лабораторних значень без units і reference ranges.
- Git push при підозрі на секрети в записі.
- Створення файлів із суфіксами -2, FINAL, evening і будь-яких варіантів
  canonical імені.
- Копіювання системних логів, помилок провайдерів і cron-виводу в щоденник:
  це операційні події, не спостереження про самопочуття.
Повні лістинги references, шаблонів і helper-скриптів краще винести в окремий fixture після фінальної перевірки команд. До появи такого репозиторію стаття не повинна обіцяти готове посилання. Reflection skill докладно розберемо в третій статті, для встановлення достатньо створити його каркас.
Перевірка: надішліть боту текст «Спав 7 годин, енергія 4, настрій 4, стрес 2, тренування не було». Має зʼявитися файл daily/2026/06/2026-06-06.md із заповненим frontmatter і вашим текстом у розділі Raw. Надішліть уточнення «поправка: спав 6 годин»: файл має оновитися, другий файл зʼявитися не повинен.
Якщо не спрацювало: перевірте, що skill видно агенту (hermes skills list), і що в SKILL.md вказані правильні шляхи до vault.
Крок 9. Приватний Git-репозиторій
Git тут вирішує два завдання: backup і історію виправлень. Коли через місяць ви виправите помилку розпізнавання в старому записі, саме git history покаже, що й коли змінилося.
cd ~/wellbeing-journal
git init
git add .
git commit -m "Initial vault structure"
Створіть на GitHub порожній приватний репозиторій і підключіть його через SSH-ключ або системний credential helper. Не використовуйте plaintext-токен у remote URL: він лишиться в конфізі назавжди.
git remote add origin [email protected]:youruser/your-private-journal.git   # placeholder
git push -u origin main
Обов’язковий .gitignore до першого осмисленого коміту:
.obsidian/workspace*
.trash/
*.tmp
.DS_Store
І правило, яке варто вивчити до, а не після: видалення файлу наступним комітом не видаляє його з історії. Якщо в репозиторій колись потрапить токен або фото документа з особистими даними, просте «видалити й закомітити» не допоможе: знадобиться перезапис історії й ротація секрету. Я проходив це на робочому проєкті й описав в окремій статті, як ми вичищали випадково запушені секрети: краще прочитати її до того, як знадобиться.
Тому в safe_commit.sh перед кожним комітом виконується примітивний, але робочий secret scan. Скелет, який легко розширити під свої патерни:
#!/usr/bin/env bash
# safe_commit.sh — коміт тільки після перевірки на секрети
set -euo pipefail
cd "$(dirname "$0")/.."

# Патерни: ключі DeepSeek/OpenAI, Telegram bot token, generic
PATTERNS='sk-[A-Za-z0-9]{16,}|DEEPSEEK_API_KEY=|OPENAI_API_KEY=|[0-9]{8,10}:[A-Za-z0-9_-]{30,}'

if git diff --cached --diff-filter=ACM -U0 | grep -qE "$PATTERNS"; then
  echo "ЗУПИНЕНО: у staged-змінах знайдено можливий секрет." >&2
  exit 1
fi

git commit -m "${1:-Update journal entry}"
git push || echo "Push відкладено: записи збережено локально."
Повну версію з перевіркою схеми записів потрібно публікувати тільки разом із перевіреним fixture. До цього в статті лишається мінімальний безпечний приклад і checklist перед push.
Перевірка: зробіть тестовий push, потім склонуйте репозиторій в іншу директорію й переконайтеся, що vault відкривається зі свіжого клону. Це водночас і перевірка backup, і репетиція відновлення.
Якщо не спрацювало: майже завжди це SSH-ключі. ssh -T [email protected] покаже, чи авторизовані ви.
На цьому місці систему вже можна вимкнути й користуватися
Файли на місці, історія змін є, restore перевірено. Все нижче — покращення, а не обов’язкова частина.
Крок 10. Obsidian і читання з телефона
На десктопі все просто: відкрийте ~/wellbeing-journal як vault. З телефоном складніше, і тут я дам чесну пораду замість красивої: не підключайте два механізми синхронізації до однієї папки. Git та iCloud/Obsidian Sync, які одночасно пишуть в один vault, рано чи пізно влаштують конфлікт на найціннішому файлі.
Мій робочий варіант: canonical vault живе в Git на сервері, а на iPhone йде одностороннє дзеркало для читання (scripts/sync-to-mobile.sh робить rsync --delete у папку iCloud, виключаючи .git). Я читаю щоденник із телефона, але пишу в нього тільки через бота. Правки з телефона в дзеркалі перезапишуться наступною синхронізацією, і це свідоме обмеження, а не баг.
Альтернативи: official Obsidian Sync як єдиний механізм (без Git) або desktop-only режим. Mobile-реалізація Obsidian Git експериментальна й не підтримує SSH, на неї я б не ставив.
Перевірка: запустіть sync-to-mobile.sh спочатку з --dry-run і перегляньте список дій, потім бойовий запуск і перевірка на телефоні.
Крок 11. Нагадування о 21:00
Фінальний штрих, який перетворює набір компонентів на звичку. Спочатку зафіксуйте часовий пояс у конфізі Hermes:
# ~/.hermes/config.yaml
timezone: "Europe/Madrid"
Порожнє значення означає локальний час сервера; явне завжди надійніше. Потім, перш ніж довіряти синтаксису з будь-якої статті, зокрема моєї:
hermes cron create --help
Створюємо задачу:
hermes cron create "0 21 * * *"
  "Нагадай заповнити вечірній wellbeing check-in: сон, енергія, настрій, стрес, симптоми, тренування й важливі події дня. Не роби медичних висновків."
  --name "Evening wellbeing check-in"
  --deliver telegram
Cron-задачі виконує gateway daemon. Створити задачу недостатньо — gateway має постійно працювати, саме для цього ми встановлювали його як systemd-сервіс на кроці 4.
І не вірте розкладу на слово. Створіть тестову задачу на найближчі дві хвилини й перевірте фактичний час доставки:
hermes cron create '2m' 'Надішли рівно одне слово: ТЕСТ' --name 'STT Smoke Test Confirm' --deliver telegram
hermes cron list
# після перевірки:
hermes cron remove <job_id>
Моє перше нагадування прийшло вчасно, але тільки тому, що я прогнав цей двохвилинний тест і впіймав розбіжність заздалегідь. Тут важлива деталь: видалення працює лише за job ID, а не за іменем задачі. Година на відладку таймзони ввечері в день запуску чи дві хвилини тесту: вибір очевидний.
Перевірка: тестова задача прийшла в Telegram в очікуваний локальний час; hermes cron list показує постійну задачу на 21:00.
Якщо не спрацювало: перевірте hermes gateway status, timezone у конфізі та TELEGRAM_HOME_CHANNEL: bare --deliver telegram доставляє саме туди.
Крок 12. Наскрізний тест
Тепер проганяємо систему цілком, як один день із життя:
| Тест | Очікуваний результат | Де шукати помилку |
|---|---|---|
| Текстовий check-in | Один daily-запис і один commit | Gateway, skill, права на vault |
| Голосове повідомлення | Raw audio, transcript і структурований запис тієї самої дати | Whisper, GPU/CPU, кодек, ffmpeg |
| Скриншот тренування | Attachment збережено, поля тренування заповнені, джерело: ocr | Vision API, ліміти, MIME |
| Demo-фото документа | Дані витягнуті, але позначені needs_review: true | Vision-шар, правила skill |
| Повторне надсилання | Оновлення запису без дубля й без файлів із суфіксами | upsert-логіка, canonical шлях |
| Перезавантаження машини | Gateway піднявся сам, бот відповідає | systemd-сервіс |
| Push при вимкненому Wi-Fi | Запис збережено локально, push наздоганяє пізніше, без втрати даних | git-workflow у skill |
На наскрізний тест піде хвилин двадцять, і це найкращі двадцять хвилин усього встановлення: після них ви довіряєте системі достатньо, щоб віддати їй справжній вечірній check-in.
Наскрізний тест пройдено
Бот приймає всі формати, оновлює один запис, переживає перезавантаження й не втрачає дані при вимкненому Wi-Fi. Можна відправляти перший справжній вечірній check-in.
Фінальний чекліст
- [ ]
TELEGRAM_ALLOWED_USERSмістить тільки ваш numeric ID, бот мовчить для сторонніх. - [ ] Усі секрети в
~/.hermes/.envі менеджері паролів, жодного у vault, Git чи скриншотах. - [ ] Таймзону перевірено реальною тестовою задачею, а не припущенням.
- [ ] Голосове повідомлення розпізнається локально, заміряно латентність.
- [ ] Vision-шар налаштовано окремо, на акаунті провайдера стоїть ліміт витрат.
- [ ] Повторне надсилання за ту саму дату оновлює запис, дублікати не створюються.
- [ ] Raw input зберігається окремо від нормалізованого зведення.
- [ ] Репозиторій приватний, 2FA увімкнена, fresh clone відкривається в Obsidian.
- [ ] Gateway переживає перезавантаження машини без ручного запуску.
Як оновлювати Hermes Agent
Hermes розвивається швидко, і колись вам знадобиться оновлення. Для перевіреної версії команда оновлення: hermes update, потім обов’язково hermes doctor і hermes --version, перевірка hermes gateway status й одне тестове повідомлення боту. Після великих оновлень звірте формат заголовка skills: breaking changes у проєктах, що швидко розвиваються, трапляються.
Часті помилки
Токен у remote URL
Plaintext-токен в адресі репозиторію лишається в конфізі й історії назавжди. Тільки SSH-ключ або credential helper.
Чекати, що DeepSeek сам розбере картинку
У цій архітектурі текст і зображення розведені. DeepSeek займається текстом, а картинки йдуть через окремий допоміжний vision-шар: окремий крок налаштування й окремий бюджет (у мене це невеликий ліміт OpenAI API).
Chat ID замість allowlist
Адреса доставки й право розмовляти з ботом: різні налаштування. Без TELEGRAM_ALLOWED_USERS бот відкритий усім.
Cron без перевірки таймзони
Спочатку тестова задача через дві хвилини, потім постійний розклад. Інакше «21:00» виявиться часом сервера, а не вашим.
Два sync-механізми на один vault
Git плюс iCloud, які одночасно пишуть в одну папку, колись влаштують конфлікт. Одне canonical джерело, решта: одностороннє дзеркало.
Налаштувати все одразу й потім відлагоджувати
Шість шарів, налаштованих без проміжних перевірок, відлагоджуються довше, ніж встановлюються. Крок, перевірка, наступний крок.
Що далі
Найдивніший момент настає після всього встановлення. Кілька годин возишся з Ubuntu, ключами, systemd і Git, а потім відправляєш боту перше голосове повідомлення. За пару секунд з’являється Markdown-файл, і раптом розумієш, що саме заради цих кількох рядків все й затівалося.
Система зібрана й перевірена, але найцікавіше починається після: перший тиждень записів, перші помилки розпізнавання, перші тижневі зведення й питання «а що мені тепер з усім цим робити». Про це третя стаття: щоденна експлуатація, чесна місячна рефлексія без вигаданого RAG, дашборди в Obsidian, реальна вартість за шарами й приватність. Саме там я розповім, як щоденник упіймав мою звʼязку «мелатонін → розбитий ранок», яку я сам не помічав.
FAQ
Чи потрібен GPU?
Ні. faster-whisper працює на CPU, просто розпізнавання займає більше часу. GPU може помітно скоротити затримку; фактичну latency потрібно виміряти на обраній моделі й залізі.
Чи підійде Raspberry Pi або VPS?
Текстовий шлях: так. Локальне розпізнавання мовлення на слабкому ARM буде болісним, на VPS додасться питання довіри до хостера, у якого лежить ваш щоденник. Старий x86-ноутбук: золота середина.
Чи можна на Windows або macOS?
Hermes підтримує й інші платформи, але happy path цього мануалу обмежений Ubuntu. Команди можна вважати відтворюваними тільки після заповнення блоку версій і наскрізного тесту. На macOS загальна логіка та сама, відмінності починаються у встановленні залежностей і автозапуску.
Скільки часу займає встановлення?
Особисто в мене переїзд з минулої системи зайняв кілька годин, але це не універсальний benchmark. Для першого запуску розумно закласти один підхід на базову систему й окремий на vault, skills та наскрізний тест, особливо якщо доведеться розбиратися з GPU, systemd чи Telegram delivery.
Де фізично зберігаються мої дані й хто має до них доступ?
Записи й оригінали живуть на вашій машині й у приватному GitHub-репозиторії. По дорозі їх бачать Telegram (зокрема голосові повідомлення), DeepSeek (текст) і vision-провайдер (зображення). Локальний faster-whisper виключає додаткове надсилання аудіо STT-провайдеру, але не прибирає Telegram із ланцюжка. Private repo — це контроль доступу, а не шифрування: докладний розбір меж довіри в третій статті.
Скільки коштує DeepSeek на місяць при щоденному використанні?
Вартість текстового шару залежить від фактичної кількості токенів і актуальних тарифів: cached input, uncached input і output рахуються окремо. Vision оплачується окремо й при частих зображеннях може стати помітною частиною бюджету. Формулу розрахунку й датований знімок цін я даю в третій статті; перед налаштуванням звіртеся з офіційною сторінкою цін DeepSeek.